Thursday 21 February 2013

Handle Alert Popup | Modal dialog

PopUps

Web Applications generate 3 different types of PopUps;  namely,

     1| JavaScript PopUps
     2| Browser PopUps
     3| Native OS PopUps [e.g., Windows Popup like Upload/Download]

JavaScript pop-ups are generated by the web application code. Selenium provides an API to handle JavaScript pop-ups

Alert alert = driver.switchTo().alert();

accept(), dismiss(), getText(), and sendKeys() are some of the most important Alert functions.


Handling JS PopUp


#Print Alert Text and Close


    import org.openqa.selenium.Alert;

    Alert alert = driver.switchTo().alert();
    System.out.println(closeAlertAndGetItsText());

    private String closeAlertAndGetItsText() {
      try {
        Alert alert = driver.switchTo().alert();
        String alertText = alert.getText();
        System.out.println(alertText); //Print Alert popup
        if (acceptNextAlert) {
        alert.accept(); //Accepts Alert popup [OK]
        } else {
        alert.dismiss(); //Cancel Alert popup
        }
        return alertText;
        } finally {
        acceptNextAlert = true;
        }
        }


#Assert Alert Text


    Alert alert = driver.switchTo().alert();
    assertEquals("Expected Value", closeAlertAndGetItsText());


isAlertPresent()


    driver.findElement(By.id(Value)).click();
    isAlertPresent();

    private void isAlertPresent() {
        try {
        Alert alert = driver.switchTo().alert();
         System.out.println(alert.getText());
         alert.accept();       
        } catch (NoAlertPresentException e) {
         System.out.println("Alert not available");
                return;
        }
      }

Tuesday 19 February 2013

How to set proxies with Username and Password in FirefoxDriver


Setting up Custom Firefox Profile to run Selenium Tests on Desktop Firefox

Even though Selenium – WebDriver – FirefoxDriver – Proxy with Basic/Kerberos Authentication didn’t work, you can achieve this with an alternate step that overrides Firefox browser Proxy Authentication.

The alternate step is nothing but allowing WebDriver to run tests on default/custom Firefox profile rather than running from FirefoxDriver.

Note:
In Selenium 2.0 (WebDriver) every popular browsers has its own selenium drivers to run tests.

Let us go with the concept now…


Create Firefox Profile Manager

Important: Before you can start the Profile Manager, Firefox must be completely closed.

1. At the top of the Firefox window, click on the Firefox button and then select Exit
2. Press Win + R (click the Windows Start button and select Run... on Windows XP).
3. In the Run dialog box, type in:
    firefox.exe -p
4. Click OK.


5. Now, create the firefox profile "myProjectProfile".

If the Profile Manager window does not open, Firefox may have been running in the background, even though it was not visible. Close all instances of Firefox or restart the computer and then try again.

Add this New Firefox Profile on your code

ProfilesIni profile = new ProfilesIni();
FirefoxProfile myprofile = profile.getProfile("myProjectProfile");
WebDriver driver = new FirefoxDriver(myprofile);

Firefox configuration settings

This works fine without prompting any authentication when you do the following settings..

1) Type "about:config" on your FF url
2) Now type "Proxy" in the search field
3) Make sure "signon.autologin.proxy" is set "true" (By default it is "false")

Friday 15 February 2013

How to set Temporary manual Proxy using WebDriver

The easiest and recommended way is to manually set the proxy on the machine that will be running the test. If that is not possible or you want your test to run with a different configuration or proxy, then you can use the following technique that uses a Capabilities object. This temporarily changes the system’s proxy settings and changes them back to the original state when done.

IE [Internet Explorer]

String PROXY = "localhost:8080";

org.openqa.selenium.Proxy proxy = new org.openqa.selenium.Proxy();
proxy.setHttpProxy(PROXY)
     .setFtpProxy(PROXY)
     .setSslProxy(PROXY);
DesiredCapabilities cap = new DesiredCapabilities();
cap.setCapability(CapabilityType.PROXY, proxy);

WebDriver driver = new InternetExplorerDriver(cap);


FF [Firefox]

String PROXY = "localhost:8080";

org.openqa.selenium.Proxy proxy = new org.openqa.selenium.Proxy();
proxy.setHttpProxy(PROXY)
     .setFtpProxy(PROXY)
     .setSslProxy(PROXY);
DesiredCapabilities cap = new DesiredCapabilities();
cap.setCapability(CapabilityType.PROXY, proxy);

WebDriver driver = new FirefoxDriver(cap);

Monday 11 February 2013

How to configure Apache Ant on Mac OS X?


Installing Apache Ant on MAC is quite different from Windows.
We use Terminal instead of cmd prompt in MAC.

Steps to Install Apache Ant on MAC OS X:

1. Down­load the lat­est ver­sion of Apache Ant.

2. Open the Ter­mi­nal application.

3. Now you’ll need to manip­u­late files in the /usr/local/ which means you’ll need root priv­i­leges. To get them use “sudo” com­mand (lucky you are, Mac OS X already has sudo as well) and enter your root pass­word.
sudo sh

System_name:~ Username$ sudo sh
Password:
sh-3.2$

4. Move/Copy the archive into /usr/local/:
mv apache-ant-1.8.4-bin.tar.gz /usr/local/

5. Go to /usr/local/:
cd /usr/local/

sh-3.2$ cd /usr/local/

6. Unar­chive the sources:
tar xvzf apache-ant-1.8.4-bin.tar.gz

sh-3.2$ tar xvzf apache-ant-1.8.4-bin.tar.gz

7. Change the apache-ant-1.8.4 direc­tory owner to your nor­mal user:
chown YourUsername:YourGroup apache-ant-1.8.4

If you’re not sure about the user­name and the group sim­ply type “ls –la”. This com­mand will print out all files and direc­to­ries in the cur­rent direc­tory (/usr/local/). The Ant sources you just copied will have your user­name and your group:
-rw-r--r--@  1 Sams staff  5425171 12 Feb 15:24 apache-ant-1.8.4-bin.tar.gz

sh-3.2# ls -la
total 10600
drwxr-xr-x   5 root          wheel      170 Feb 12 16:05 .
drwxr-xr-x@ 11 root          wheel      374 Dec 29 19:47 ..
drwxr-xr-x@ 14 root          wheel      476 Feb 12 16:05 apache-ant-1.8.4
-rw-r--r--@  1 user_name  staff  5425171 Feb 12 15:24 apache-ant-1.8.4-bin.tar.gz
drwxr-xr-x   4 root          wheel      136 Dec 29 19:47 bin

8. Now you can run Ant by typ­ing /usr/local/apache-ant-1.8.4. Not very con­ve­nient, huh?

9. Let’s make it work more friendly:
First, cre­ate a sym­bolic link to refer the appli­ca­tion as ant instead of apache-ant-1.8.:
ln -s apache-ant-1.8.4 ant

sh-3.2# ln -s apache-ant-1.8.4 ant

Sec­ond, add the fol­low­ing lines into your shell con­fig:
export ANT_HOME_DIR=/usr/local/ant
export PATH=${PATH}:${ANT_HOME_DIR}/bin

sh-3.2# export ANT_HOME_DIR=/usr/local/ant
sh-3.2# export PATH=${PATH}:${ANT_HOME_DIR}/bin
sh-3.2# 

10. Restart your Ter­mi­nal and type “ant”. If it says “Build­file: build.xml does not exist! Build failed” which means that Apache Ant works correctly.

Else open terminal and type,
ant -version


Tuesday 5 February 2013

Capture the Screen on Test failure - WebDriver


Screen captures of the browser session helps you to show error conditions.

#JAVA

WebDriver driver = new FirefoxDriver();
driver.get("http://www.google.com/");
File scrFile = ((TakesScreenshot)driver).getScreenshotAs(OutputType.FILE);
FileUtils.copyFile(scrFile, new File("c:\\sample.jpeg"),true);

#Python

#!/usr/bin/env python
from selenium import webdriver
browser = webdriver.Firefox()
browser.get('http://www.google.com/')
browser.save_screenshot('screenie.png')
browser.quit()


Example Test
[Note:- "Scripts in Orange color are mandatory"]

import java.io.File;
import org.apache.commons.io.FileUtils;
import org.openqa.selenium.OutputType;
import org.openqa.selenium.TakesScreenshot;
  
  public class classname{
  private WebDriver driver;
  private String baseUrl;
  private boolean acceptNextAlert = true;
  private StringBuffer verificationErrors = new StringBuffer();

  @Before
  public void setUp() throws Exception {
    driver = new FirefoxDriver();
    baseUrl = "http://in.yahoo.com/";
    driver.manage().timeouts().implicitlyWait(30, TimeUnit.SECONDS);
  }

  @Test
  public void testWww() throws Exception {
    driver.get(baseUrl + "/?p=us");
    driver.findElement(By.id("p_13838465-p")).clear();
    driver.findElement(By.id("p_13838465-p")).sendKeys("screen");
    driver.findElement(By.id("search-submit")).click();
    Thread.sleep(2000);
    File scrFile = ((TakesScreenshot)driver).getScreenshotAs(OutputType.FILE);
    FileUtils.copyFile(scrFile, new File("c:\\sample.jpeg"),true);
    Thread.sleep(2000);
  }

@After
  public void tearDown() throws Exception {
    driver.quit();
    String verificationErrorString = verificationErrors.toString();
    if (!"".equals(verificationErrorString)) {
      fail(verificationErrorString);
    }
  }
}


For Selenium RC,
Use the command: captureEntirePageScreenshotAndWait
Target: C:\\$(image).jpg

This cmd won't work for WebDriver

Example with 'captureScreenshot()'

Selenium selenium;
selenium = new DefaultSelenium(seleniumServer, 4444,
    "*firefox", "http://www.google.com");
selenium.start();
selenium.open("/");
selenium.captureScreenshot("C:\screenshot.png");


Examples with 'captureEntirePageScreenshot()'


Selenium selenium;
selenium = new DefaultSelenium(seleniumServer, 4444,
    "*firefox", "http://www.google.com");
selenium.start();
selenium.open("/");
selenium.captureEntirePageScreenshot("C:\screenshot.png","");

Monday 4 February 2013

Setting up Selenium & Eclipse


Configure Selenium with Eclipse:

1. Go to URL – http://www.eclipse.org/downloads/
2. Download Eclipse IDE for Java Developers (Click on Windows 32 bit platform)
3. Unzip Eclipse and double click Eclipse.exe
4. Create a workspace folder –> C:\Workspace (or)
5. Click File menu –> Switch Worspace –> other


6. Now Select the C:\Workspace folder.
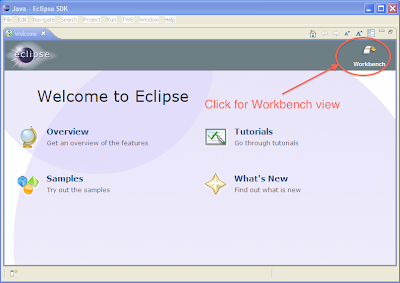
7. Click Workbench.


Download Drivers

Now, download Selenium RC server/client driver and configure that to Eclipse.

1. Download Selenium server


Configure Selenium Client driver 

1. Go to Eclipse –> Click  File –> New –> Project (from various options need to select just “project”)
2. In Select Wizard –> Click Java –> “Java Project” (demonstrated in the below figure)


3. Give the project name (e.g. TestProject)
4. Click Finish.
5. Create a folder named “lib” inside the project "TestProject".
6. Copy the jar file "Selenium-server.jar" into "lib" folder.
7. Also extract all the jar files from "selenium-java-x.xx.x" (Selenium Client driver) into "lib" folder.
8. Right Click the project, “TestProject” and click "Build Path".
9. Select "Configure Build Path".


10. Click Libraries tab
11. Click “Add External JARs” button


12. Now, select all the jar files copied under the "lib" folder.
13. Click OK
14. Check the Referenced libraries for both the Selenium Client driver jar files as shown in the below picture.


Create class file

1. Right click on the folder "src", Click  File –> New –> Package


2. Name the Package. (e.g., testpack) and click Finish.
3. Right click on the Package and Click  File –> New –> class
4. Name the class. (e.g., Test)
5. Now copy the generated test script into the class workspace and run it.

Configure TestNG with Eclipse


How to set-up TestNG framework with Eclipse ? Here it is...........
This set-up doesn't require any .jar or .exe files.

Steps to Configure TestNG with Eclipse:

1. Click Help –> Install New Software


2. Type “http://beust.com/eclipse” in the “Work with” edit box and click ‘Add’ button.


3. In the ‘Name’ column we can see “TestNG” –> Select this and click ‘Next’ button


4. Click Next and click on the radio button “I accept the terms of the license agreement”.

5. Click ‘Next’ button

6. Click ‘Finish’


  • This will install the TestNG plug-in for Eclipse
  • After the installation, it will ask for restart of Eclipse.  Then restart the Eclipse.
  • Once the Eclipse is restarted, we can see the TestNG icons & menu items as in the below figures.